
This is a list, with illustrations, of different shooting positions for typical use with a precision type weapon. However, they can obviously be adapted to any weapon type you like.
These are all unsupported and as such, are the least stable of positions that you could ever choose to use. Utilizing some sort of sling technique would be a good idea with these. It makes it more stable and any edge you can get is a good idea.
The fundamental similarity between every single one of these positions is quality bone support. That’s why some of them look so silly, especially the low sitting. No one laughs at how silly you look when they’re calling themselves out…
The rule of thumb for selecting a position is to be only as high as you have to be to get the shot. The lower you are, the more stable you are, the more accurate your shot will be.
From least stable to more stable (highest to lowest):
Standing
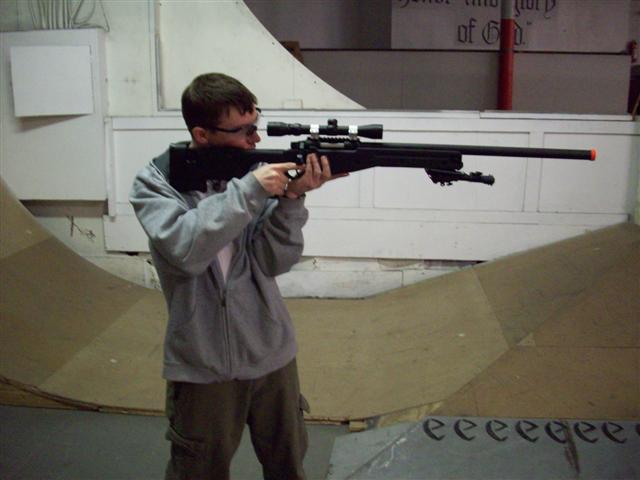
The most unstable of ANY shooting position.
This should only be attempted on stationary targets. There’s already enough going on with this position that could go wrong without trying to engage a mover. The most important aspect of this position you should remember is that you are probably not going to get a hit. This technique should not be considered precise by any means, but desperate times call for desperate measures. Here’s the best methods for a poor technique.
Position your support arm elbow against your body and lean slightly back. Position the hand to support the rifle using as little muscular tension as possible. Most of the weight will probably be forward of your support hand. Do not use your firing hand to pull down on the rear portion to compensate. Your firing hand should be pulling the rifle into your shoulder. This should compensate for most of the forward weight, but use your cheek weld to further solidify the position.
This position can only be reliably maintained for the span of one shot. Due to the natural instability of the standing position, you need to concentrate most of your efforts of getting the best possible natural point of aim and applying the breathing, sighting, and trigger manipulation fundamentals as religiously as ever.
A technique that I used whenever attempting to fire accurately from the standing is a variation of the combination of tracking and ambush methods of moving target engagement. Get your the best natural point of aim you can in regards to horizontal position (that is, worry about being aligned on the targets vertical axis, without being left or right of it). Establish your position and take in a deep breath that puts your sights directly above the target. Begin taking up your trigger and slowly exhale. Squeeze and exhale evenly until your sights drop to the target, that’s exactly when the trigger should break. Don’t pause to fire or hold your breath. Using this technique I was able to attain three 5′s and two 4′s in the standing portion of the rifle qualification of boot camp (100 yards with open sights).
Kneeling

Relatively stable while quick to assume.
This is a good quick position to assume. This position is very easy to do incorrectly and it’s not stuff that people will naturally think about. Therefore, take the following pointers and get the edge.
Your support arm elbow does not rest on the top of your support leg knee. This puts your body position that provides stability in vertical travel, but you aren’t stable horizontally. Position your elbow forward of the knee so that the back of your arm is on the front of your knee. Think of yourself as trying to rest your armpit on your knee and your getting close.
Your support hand can afford to rest a little bit farther out on the stock for better balance. Just don’t toss it too far out there because then you’re using the muscles in your forearm to hold the rifle up and they’ll fatigue quickly this way and be less stable as a result.
Your firing side leg is the keystone of this position. Many people will naturally put their toe up and with your support arm so far forward, their butt won’t be in contact with anything. However, if you don’t lay your leg from the knee to the toe flat on the ground, and sit your butt on it, you are holding your entire body up with muscle support and you will fatigue quickly and be less stable as a result. Seeing the pattern?
Push your firing leg knee out as far as you can so it’s perpendicular to the rifles long axis (like a “T”) and sit your self down on the heel of your foot. You can lay your foot sideways if you like, but this hurts my ankle, so I go laces flat and my toes pointing.
Adjust your support side foot forward or backward to adjust elevation and vertical natural point of aim. Pivot on that same foot while sliding the firing leg to adjust your natural point of aim horizontally.
High Sitting
Archaic but has it's place in the toolbox.
Personally, I think this position is much to unstable when used in conjunction with modern sniper rifles to be effective, but it’s still taught because the Marine Sniper book has a picture of it on the cover. With old school sniper rifles, it may have been more feasible, but these days the rifles have huge scopes, bull barrels, ginormous stocks, bipods, etc. It’s not uncommon for a modern sniper rifle to be pushing twenty pounds whereas the Vietnam era rifles in use when this position was popularized were exceptionally heavy if they were eleven pounds. I’d say Mr. White Feather’s rifle was probably seven pounds.
Regardless, it gets you a little higher than the low sitting, and it looks considerably less stupid and awkward.
The high sitting is easiest to attain if you start from the standing. Cross your feet and put your heels as close together as possible. Hold your rifle with a firing grip and cradle the forearm in your support elbow. Then attempt to sit straight down on your heels without leaning forward or back. This gets your feet as tucked in as possible.
As your knees approach your chest, your support arm grabs your firing leg knee while wrapping around the support leg knee. The firing arm wraps around the firing side leg. Draw it all in tight like your stuck inside an shell like an egg or something.
Your body should be at an angle to the target. Basically, your support elbow and firing toe with point toward the target, give or take. To adjust your natural point of aim, push and pull with your toes to spin your body.
This position is difficult to maintain with a front heavy rifle. Unfortunately with many of the modern rifles, they are too heavy to just rest, so you must hold them down with your firing hand, support hand, and cheek weld. This makes the position rather unstable, but desperate times call for desperate measures.
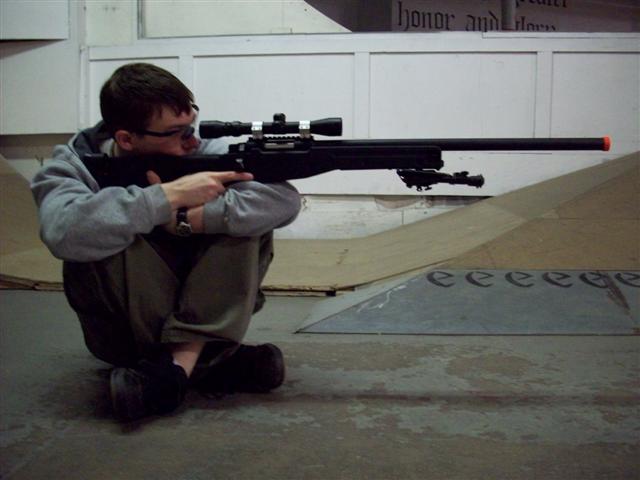
Low Sitting

Ugly but stable.
This position starts in much the same way as the High Sitting, but your knees spread as you lower and you do sit on your heels.
Position both elbows forward of the knees like you did with the Kneeling position that’s pretty much it. Your weight will be slightly forward of your comfortable center of gravity, but it’s pretty stable once you get it locked in. It’s good for being a little higher than prone will get you, and not putting your butt on the wet ground or something.
Consider it an alternative to the Rice Patty Prone position, which is covered in the Unconventional Shooting Positions article.
Prone
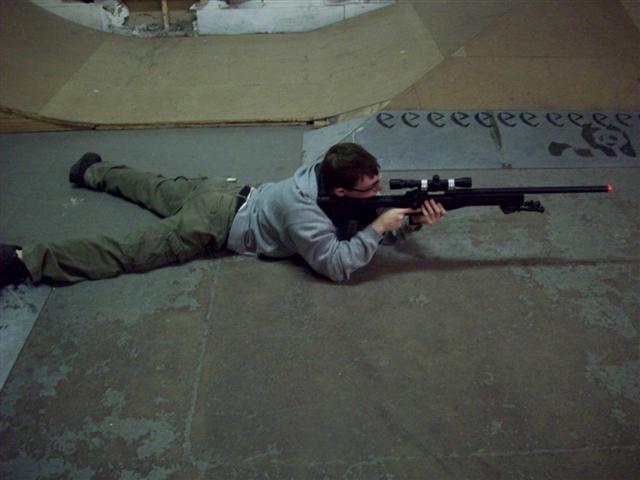
Your best option, but it shouldn't be hard to find support too.
To be honest, if your able to use this position, there’s no reason not to use something as support. A ruck, bipods, etc. but if you find the need to use this position, here’s how.
Do not lay down at an angle to the target like people usually do. For airsoft, it’s not really that big of a deal I guess, but if you’re firing anything that offers up some sort of recoil, having the centerline of your body behind the rifle does wonders to manage recoil and get quicker follow up shots.
Everything from your navel (belly button, not floating ships, they’re NAVAL) down needs to be flat against the ground. This includes your feet. If you make it to sniper school at some point in your life, and you have your laces flat to the ground and heel in the air, your going to find a two hundred pound instructor standing on them. Being flat provides stability and not having them sticking up is one less thing to get you spotted. They remain hidden behind your body.
Extend your elbows as far forward as possible. Just like you put the back of your elbows on the front of your knees in the other positions, you’re trying to put the back of your elbows on the ground. This doesn’t make sense, and isn’t really possible, but trying helps get you in the proper position.
Aside from this, keep your support hand as much above it’s elbow as possible so the rifle rests on bone support. The firing elbow is slightly pushed out to the side for lateral support of your body, the rifle should only rest on your support hand and shoulder. The firing hand only fires and throws the bolt.